


How to install your Bushman fridge for optimal ventilation and air flow
- Date Published: 8 January 2025
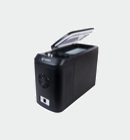
- Bushman Fridges
- Roadie (15L), OG Bushman (35L, 52L), DC-X Upright (50L, 65L, 85L, 130L), DC-L Upright (190L), Drawer (30L)
Importance of Air flow
Symptoms of a lack of ventilation
The symptoms of not having enough ventilation for your 12V fridge include:
- Your fridge uses a lot more power than the manufacturer specifications.
- Your fridge struggles to get cold in really hot weather.
- Sometimes your fridge stops for no reason (thermal overload!).
Where to install vents
How many vents and the location of vents depends on your installation – In general terms two large vents, one up high, and one down low, is the minimum you need. This allows the hot air to rise up and out of the top vent, while drawing the cooler outside air into the lower vent. Please refer to your owner’s manual for specific dimensions and locations for each fridge model. These can also be downloaded from the Bushman website, or contact Bushman for a copy.
Owners manual downloads
Top tips to allow for ventilation and airflow around your fridge

1. Using fluted vents
Fluted vents are the most common type of ventilation and are readily available online. When using fluted vents, please remember these only have about half their size in free air flow. For example, a 400mm x 200mm vent has a free airflow cross section of only 400cm2 (not 400mm x 200mm = 800cm2).

2. Use a hole saw
You can use a hole saw to cut out circular vents. If you are cutting holes with a hole saw, use the largest size holes you can. Small holes are a lot more restrictive. For example, a hole with a 5cm diameter only has an area of 19cm2, whereas a slightly larger hole with a 7cm diameter has an area of 38cm2 or twice as much! Always make your holes as big as possible.

3. Add extra vents where you can
If you can cut vents to more than two sides of your fridge cavity, then go for it! The more vents and / or free air flow to the compressor area the better. You can never have too much air flow.

4. Install an exhaust fan
If you use a 12V fan positioned in a circular cut-out as an alternative to a large, fixed vent, the fan should be set to run non-stop. This way it mimics a static vent by always providing air flow.
Why circular vents are the best!
Circular cut-outs make the best vents, as they have no flutes or restrictions to air flow. Just remember, for every 40% increase in diameter, you increase the size of the vent by 100%! So go large and make your circular cut-outs as big as possible.
Look at the difference between a 10cm diameter hole and a 20cm diameter hole!:
| Hole Diamater | Hole Area |
| 5cm | 19cm2 |
| 7cm | 38cm2 |
| 10cm | 79cm2 |
| 20cm | 315cm2 |